本章目录In this chapter
- 7 · The Permission System
- 7.1 Six Permission Modes
- 7.2 The Ten-Step Decision Cascade
- 7.3 Auto Mode: Model Classifier + Three-Tier Fast Path
- 7.4 Permission Rule Syntax
- 7.5 Sandboxing and Read-Only Command Detection
- 7.6 The Full Data Structure Behind a Permission Decision
- 7.7 Explainability of Permission Decisions
7 · 权限系统
utils/permissions/ 目录下有 21 个文件,核心的 permissions.ts 有 51 KB。这一章讲清楚「凭什么让这个工具调用跑起来」这个问题的完整答案。
7.1 六种权限模式
const PERMISSION_MODE_CONFIG: Partial<Record<PermissionMode, PermissionModeConfig>> = {
  default:           { title: 'Default',             symbol: '',    color: 'text' },
  plan:              { title: 'Plan Mode',           symbol: '⏸',   color: 'planMode' },
  acceptEdits:       { title: 'Accept edits',        symbol: '⏵⏵',  color: 'autoAccept' },
  bypassPermissions: { title: 'Bypass Permissions',  symbol: '⏵⏵',  color: 'error' },
  dontAsk:           { title: "Don't Ask",           symbol: '⏵⏵',  color: 'error' },
  ...(feature('TRANSCRIPT_CLASSIFIER') ? {
  auto:              { title: 'Auto mode',           symbol: '⏵⏵',  color: 'warning' },
  } : {}),
}claude-code/src/utils/permissions/PermissionMode.ts
| 模式 | 行为 |
|---|---|
default | 默认。危险操作弹确认框问用户 |
plan计划模式 | 只允许只读操作。模型先做调研、出方案,用户批准后才切回执行模式。用来防止「模型理解错了就直接动手」 |
acceptEdits接受编辑 | 文件编辑类操作自动放行,其他仍然要问。比默认宽松,比 bypass 严格 |
bypassPermissions跳过权限 | 对应 --dangerously-skip-permissions。但仍有一层绕不过,见 7.2 |
dontAsk不要问我 | 把所有「需要询问」直接转成「拒绝」。和 bypass 相反 —— bypass 是「都放行」,这个是「都拒绝」。适合完全不想被打扰又不想冒险的场景 |
auto自动模式 | 内部版特性。用模型分类器代替人来做安全判断,见 7.3 |
还有一个类型上的区分很讲究:
export function isExternalPermissionMode(mode: PermissionMode): mode is ExternalPermissionMode {
  if (process.env.USER_TYPE !== 'ant') return true      // 外部用户没有 auto,所以永远为真
  return mode !== 'auto' && mode !== 'bubble'
}

export function toExternalPermissionMode(mode: PermissionMode): ExternalPermissionMode {
  return getModeConfig(mode).external      // auto 对外映射成 default
}内部模式对外要有一个映射。auto 模式对外部接口报告成 default —— 这样开发工具包的使用者不会看到一个他们理解不了、也无法设置的模式值。
7.2 十步决策级联
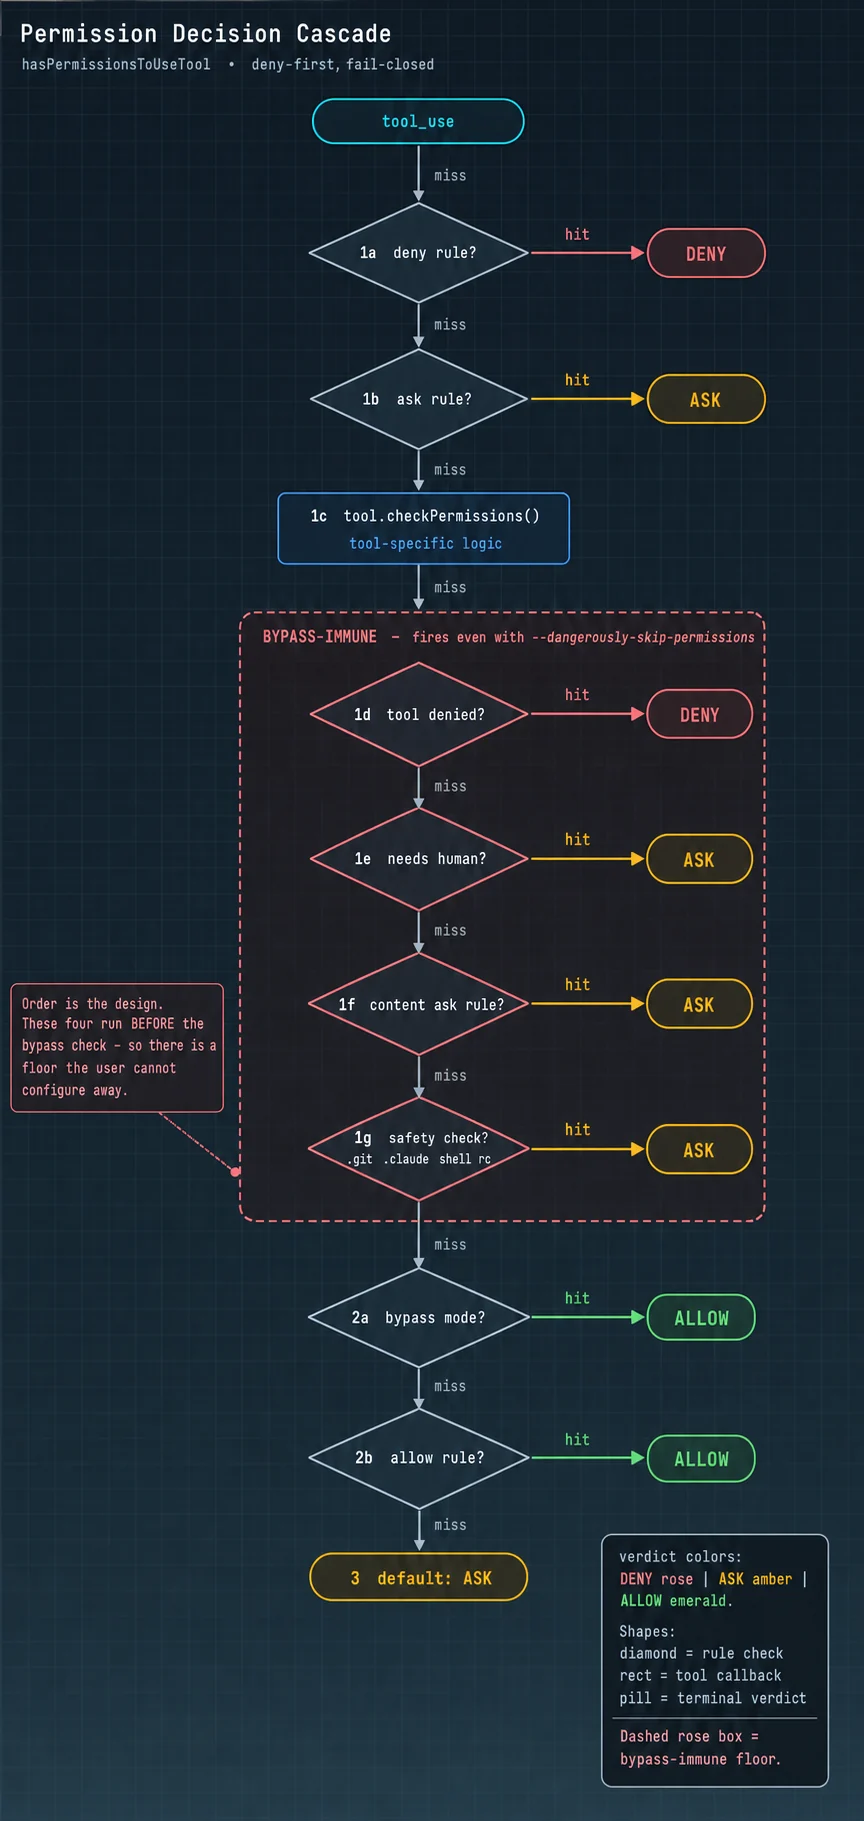
核心函数 hasPermissionsToUseToolInner() 是一条严格有序的判定链,从上到下逐条检查,第一个命中的直接决定结果:
| 步骤 | 检查什么 | 结果 |
|---|---|---|
| 0 | 中止信号已拉 | 拒绝 |
| 1a | 整个工具被拒绝规则命中 | DENY |
| 1b | 整个工具被询问规则命中 | ASK 例外:如果这条 Bash 命令能在沙箱里安全执行,跳过继续往下 |
| 1c | 调用工具自己的 checkPermissions() | 拿到工具自己的判断,不直接出结果 |
| ↓ ↓ ↓ 以下四步是 bypass 免疫层 ↓ ↓ ↓ | ||
| 1d | 工具自己明确说了「拒绝」 | DENY |
| 1e | 工具声明「必须有人在场」 | ASK |
| 1f | 用户显式配了内容级询问规则 | ASK |
| 1g | 安全检查:碰到敏感路径 | ASK |
| ↑ ↑ ↑ 以上四步是 bypass 免疫层 ↑ ↑ ↑ | ||
| 2a | bypassPermissions 模式 | ALLOW |
| 2b | 整个工具被允许规则命中 | ALLOW |
| 3 | 都没命中 | ASK(默认落到人工确认) |
bypass 免疫层的四条源码注释
// 1d. Tool implementation denied (catches bash subcommand denies wrapped ...)
// 1e. Tool requires user interaction even in bypass mode
// 1f. Content-specific ask rules from tool.checkPermissions take precedence
//     over bypassPermissions mode. When a user explicitly configures a
//     content-specific ask rule (e.g. Bash(npm publish:*)), the tool's
//     checkPermissions returns {behavior:'ask', ...}. This must be respected
//     even in bypass mode, just as deny rules are respected at step 1d.
// 1g. Safety checks (e.g. .git/, .claude/, .vscode/, shell configs) are
// bypass-immune — they must prompt even in bypassPermissions mode.| 步骤 | 守的是什么 |
|---|---|
| 1d | 工具作者的判断。工具最了解自己的操作有多危险,它的拒绝不能被外部覆盖 |
| 1e | 物理必要性。「向用户提问」这个工具,没人在场就无法完成,放行也没意义 |
| 1f | 用户更具体的意图。用户开 bypass 是想说「别拿常规操作烦我」,但他专门配了 Bash(npm publish:*) 要问,说明这一条是他特意留的闸门。更具体的配置优先于更笼统的配置 |
| 1g | 不可挽回的破坏。删掉 .git/ 等于丢掉整个版本历史;改掉 .claude/ 等于智能体自己改自己的权限配置;改 shell 启动脚本等于留后门 |
「绕过权限」不等于「绕过一切」。这是一个成熟的产品判断:给用户「关掉烦人确认」的自由,但不给「一键自毁」的自由。如果不留这个底座,第一个不小心让智能体删掉自己 .git 的用户,会永久失去对这个产品的信任。
7.3 自动模式:模型分类器 + 三级快速通道
当判定落到 ASK 且当前是自动模式时,Claude Code 不弹窗,而是再调一次模型来判断这个动作安不安全。这个专用调用叫「分类器」。
但分类器不便宜 —— 每个工具调用一次额外的接口请求。所以前面挡了几层:
if (feature('TRANSCRIPT_CLASSIFIER') &&
    (appState.toolPermissionContext.mode === 'auto' ||
     (appState.toolPermissionContext.mode === 'plan' && isAutoModeActive()))) {

  // 拦截 1:安全检查命中、且这类检查"分类器无权批准"
  if (result.decisionReason?.type === 'safetyCheck' &&
      !result.decisionReason.classifierApprovable) {
    if (appState.toolPermissionContext.shouldAvoidPermissionPrompts) {
      return { behavior:'deny', message: result.message,
               decisionReason: { type:'asyncAgent',
                 reason:'Safety check requires interactive approval and permission '
                      + 'prompts are not available in this context' } }
    }
    return result       // 保持 ASK
  }

  // 拦截 2:工具声明"必须有人在场"
  if (tool.requiresUserInteraction?.() && result.behavior === 'ask') return result

  // 拦截 3:PowerShell(除非编译期开了特殊开关)
  if (tool.name === POWERSHELL_TOOL_NAME && !feature('POWERSHELL_AUTO_MODE')) { ... }

  // 快速通道 ①:伪装成 acceptEdits 模式再问一次工具
  if (result.behavior === 'ask' &&
      tool.name !== AGENT_TOOL_NAME && tool.name !== REPL_TOOL_NAME) {
    const acceptEditsResult = await tool.checkPermissions(parsedInput, {
      ...context,
      getAppState: () => ({ ...context.getAppState(),
        toolPermissionContext: { ...state.toolPermissionContext,
                                 mode: 'acceptEdits' as const } }),
    })
    if (acceptEditsResult.behavior === 'allow') {
      logEvent('tengu_auto_mode_decision', { decision:'allowed', fastPath:'acceptEdits', ... })
      return { behavior:'allow', updatedInput: acceptEditsResult.updatedInput ?? input,
               decisionReason: { type:'mode', mode:'auto' } }
    }
  }

  // 快速通道 ②:安全工具白名单
  if (classifierDecisionModule!.isAutoModeAllowlistedTool(tool.name)) {
    logEvent('tengu_auto_mode_decision', { decision:'allowed', fastPath:'allowlist', ... })
    return { behavior:'allow', updatedInput: input, decisionReason: { type:'mode', mode:'auto' } }
  }

  // 都没命中 → 真的调分类器
  const action = formatActionForClassifier(tool.name, input)
  setClassifierChecking(toolUseID)
  let classifierResult
  try {
    classifierResult = await classifyYoloAction(
      context.messages,                    // ★ 完整对话记录
      action,
      context.options.tools,
      appState.toolPermissionContext,
      context.abortController.signal)
  } finally {
    clearClassifierChecking(toolUseID)
  }
  ...
}claude-code/src/utils/permissions/permissions.ts
快速通道 ① 的巧妙之处
它把权限模式临时伪装成 acceptEdits,再问工具一次。逻辑是:如果连宽松模式都会放行这个操作,说明它确实无害,没必要付费问分类器。
但两个工具被明确排除:
「Skip for Agent and REPL — their checkPermissions returns 'allow' for acceptEdits mode, which would silently bypass the classifier. REPL code can contain VM escapes between inner tool calls; the classifier must see the glue JavaScript, not just the inner tool calls.」
译:跳过 Agent 和 REPL 工具 —— 它们的权限检查在 acceptEdits 模式下返回「允许」,会静默绕过分类器。REPL 工具的代码可能在内部工具调用之间夹带虚拟机逃逸;分类器必须看到那些胶水 JavaScript 代码,而不只是内部的工具调用。
这是「组合安全 ≠ 单元安全」的绝佳例子。A 安全、B 安全,不代表「先 A 再 B,中间夹一段自定义逻辑」也安全。
分类器看的是完整对话记录
注意 classifyYoloAction(context.messages, ...) 的第一个参数:整个对话记录,不只是这一条命令。
这很关键。一条 rm -rf build/ 命令,在「用户要求清理构建产物」的语境下是安全的,脱离语境就无法判断。但这也带来一个问题:完整对话记录可能有几万 token,塞进分类器会爆。
所以工具接口里有一个专门为此服务的方法:
/**
 * Returns a compact representation of this tool use for the auto-mode
 * security classifier. Examples: `ls -la` for Bash, `/tmp/x: new content`
 * for Edit. Return '' to skip this tool in the classifier transcript
 * (e.g. tools with no security relevance). May return an object to avoid
 * double-encoding when the caller JSON-wraps the value.
 */
toAutoClassifierInput(input: z.infer<Input>): unknown每个工具自己提供只保留安全语义的压缩表示:Bash 给命令行文本,Edit 给「路径 + 新内容」,没有安全含义的工具返回空串直接不进视野。
连续拒绝追踪:打破僵局
// 任何一次成功放行都重置连续拒绝计数
if (result.behavior === 'allow') {
  const currentDenialState = context.localDenialTracking ?? appState.denialTracking
  if (appState.toolPermissionContext.mode === 'auto' &&
      currentDenialState && currentDenialState.consecutiveDenials > 0) {
    const newDenialState = recordSuccess(currentDenialState)
    persistDenialState(context, newDenialState)
  }
  return result
}连续被拒达到阈值时,系统不再信任分类器,回退到人工确认。防的是这种僵局:分类器因某种误判一直拒绝,模型不明白为什么,就一直换写法重试 —— 双方都在烧钱但永远推进不了。
注意 context.localDenialTracking ?? appState.denialTracking 这个回退:
「Local denial tracking state for async subagents whose setAppState is a no-op. Without this, the denial counter never accumulates and the fallback-to-prompting threshold is never reached.」
译:为异步子智能体准备的本地拒绝追踪状态 —— 它们的全局状态写入函数是空操作。没有这个,拒绝计数永远不会累加,「回退到人工确认」的阈值也就永远达不到。
这是一个典型的「架构隔离带来的副作用」:为了让子智能体不污染主线程状态,它的 setAppState 被设成了空操作。但这也意味着任何依赖状态累加的机制在子智能体里都失效了。所以要给它一个本地的副本。
7.4 权限规则的语法
用户可以在配置文件里写权限规则。语法有两个层次:
| 写法 | 含义 |
|---|---|
Bash | 整工具级。匹配所有 Bash 调用 |
Bash(git:*) | 内容级。只匹配 git 开头的命令 |
Bash(npm publish:*) | 只匹配 npm publish 开头的命令 |
Edit(src/**) | 只匹配 src 目录下的文件编辑 |
mcp__server | MCP 服务级前缀。匹配该服务下的所有工具 |
三类规则:alwaysAllowRules(总是允许)、alwaysDenyRules(总是拒绝)、alwaysAskRules(总是询问)。
整工具级的拒绝规则会在「模型看到工具之前」就生效
/**
 * Filters out tools that are blanket-denied by the permission context.
 * A tool is filtered out if there's a deny rule matching its name with no
 * ruleContent (i.e., a blanket deny for that tool).
 *
 * Uses the same matcher as the runtime permission check (step 1a), so MCP
 * server-prefix rules like `mcp__server` strip all tools from that server
 * before the model sees them — not just at call time.
 */
export function filterToolsByDenyRules<T>(tools, permissionContext): T[] {
  return tools.filter(tool => !getDenyRuleForTool(permissionContext, tool))
}这是一个重要的区分:「整工具级拒绝」不是在调用时拦截,而是让这个工具根本不出现在模型的工具清单里。
两者的差别很大:
· 调用时拦截 → 模型会尝试调用、被拒、然后困惑地换个方式再试,浪费好几轮
· 不出现在清单里 → 模型压根不知道有这个能力,直接走别的路
而内容级规则(Bash(git:*))无法在清单层面过滤 —— 因为 Bash 工具本身要保留,只是某些参数要拦。所以它只能在调用时判定。
影子规则检测
utils/permissions/ 里有一个文件叫 shadowedRuleDetection.ts(影子规则检测)。它解决的问题是:
7.5 沙箱与只读命令判定
只读命令自动放行
utils/shell/readOnlyCommandValidation.ts,66.7 KB。它的职责是判断「这条 shell 命令是不是只读的」。如果是,就可以自动放行,不打扰用户。
这件事比看起来难得多,因为要处理:
- 管道和重定向 ——
ls | grep foo是只读的,ls > out.txt不是 - 命令替换 ——
echo $(rm -rf /)里面藏着写操作 - 复合命令 ——
cd /tmp && ls里有两条命令,都要判断 - 别名和函数 —— 用户可能把
ls别名成了别的东西
所以 utils/bash/ 目录下有一个完整的 shell 语法解析器:bashParser.ts(128 KB)+ ast.ts(109 KB)。它把 shell 命令解析成抽象语法树,然后在树上做分析,而不是用正则匹配字符串。
而且还有一个实验性的替代实现:编译期开关里能看到 TREE_SITTER_BASH 和 TREE_SITTER_BASH_SHADOW —— 后者的命名(shadow,影子)说明他们在用影子模式验证新解析器:两个解析器同时跑,结果不一致时记录下来,但仍然用旧的那个的结果。这样可以在零风险的前提下收集新实现的准确率数据。
操作系统级沙箱
在 macOS 上,Claude Code 使用系统自带的 sandbox-exec 机制(也叫 seatbelt)。它可以在进程启动时施加一份策略文件,限制这个进程能访问哪些路径、能不能联网。
权限判定链的第 1b 步有一个特殊分支就和沙箱有关:
// 1b. Check if the entire tool should always ask for permission
const askRule = getAskRuleForTool(...)
if (askRule) {
  // 当"沙箱内自动放行"开启时,能被沙箱化的命令跳过询问规则,
  // 通过 Bash 的 checkPermissions 自动放行。
  // 那些不会被沙箱化的命令(排除列表里的、显式禁用沙箱的)仍然遵守询问规则。
  if (!canSandboxAutoAllow) {
    return { behavior:'ask', ... }
  }
  // 否则继续往下,让 Bash 的 checkPermissions 处理具体命令的规则
}
逻辑是:如果这条命令会在沙箱里跑,那么即使它「看起来危险」也没关系 —— 沙箱会兜住。所以可以跳过询问。这是「用更强的隔离手段换取更少的打扰」。
7.6 权限判定的完整数据结构
export type ToolPermissionContext = DeepImmutable<{
  mode: PermissionMode
  additionalWorkingDirectories: Map<string, AdditionalWorkingDirectory>
  alwaysAllowRules: ToolPermissionRulesBySource
  alwaysDenyRules:  ToolPermissionRulesBySource
  alwaysAskRules:   ToolPermissionRulesBySource
  isBypassPermissionsModeAvailable: boolean
  isAutoModeAvailable?: boolean
  strippedDangerousRules?: ToolPermissionRulesBySource   // ★ 被剥离的危险规则
  shouldAvoidPermissionPrompts?: boolean                 // 后台任务:弹不出框
  awaitAutomatedChecksBeforeDialog?: boolean
  prePlanMode?: PermissionMode                           // 进计划模式前的模式,用于恢复
}>
两个字段值得注意:
strippedDangerousRules:被系统主动剥离的规则
用户配置里可能有一些「过于宽泛以至于危险」的规则。系统会在加载时把它们剥离掉,并把剥离的内容记录下来(这样界面上可以提示用户「你的这条规则被忽略了,因为它太宽泛」)。
源码里能看到具体的剥离逻辑,比如:
isOverlyBroadPowerShellAllowRule—— 剥离PowerShell(*)这种放行一切的规则isDangerousPowerShellPermission—— 剥离iex(下载执行)、Start-Process等前缀的放行规则
DeepImmutable:类型层面的不可变
这个包装类型让整个权限上下文在类型系统层面完全只读 —— 任何试图修改它的代码都通不过编译。权限状态的修改必须走专门的 applyPermissionUpdates() 函数,从而保证所有修改都经过统一的校验和持久化路径。
7.7 权限决策的可解释性
每一个权限决策都带一个 decisionReason(决策原因)字段:
{ type: 'rule',        rule: {...} }            // 命中了某条规则
{ type: 'mode',        mode: 'auto' }           // 因为当前模式
{ type: 'hook',        hookName: 'PermissionRequest', reason: ... }  // 钩子决定的
{ type: 'safetyCheck', classifierApprovable: false }   // 安全检查
{ type: 'asyncAgent',  reason: '...' }          // 后台任务无法交互
而且有一个专门的模块 permissionExplainer.ts 负责把这些原因翻译成人话展示给用户。
可解释性对权限系统是刚需,不是锦上添花。
当用户看到「这个操作被拒绝了」而不知道为什么时,他的第一反应是把整个权限系统关掉。而如果他看到「因为你在 ~/.claude/settings.json 第 12 行配了 deny: Bash(rm:*)」,他就知道该改哪里。
一个无法解释自己决策的安全系统,最终会被用户绕过。
7 · The Permission System
The utils/permissions/ directory holds 21 files, and the core permissions.ts alone is 51 KB. This chapter gives the complete answer to one question: “on what grounds does this tool call get to run?”
7.1 Six Permission Modes
const PERMISSION_MODE_CONFIG: Partial<Record<PermissionMode, PermissionModeConfig>> = {
  default:           { title: 'Default',             symbol: '',    color: 'text' },
  plan:              { title: 'Plan Mode',           symbol: '⏸',   color: 'planMode' },
  acceptEdits:       { title: 'Accept edits',        symbol: '⏵⏵',  color: 'autoAccept' },
  bypassPermissions: { title: 'Bypass Permissions',  symbol: '⏵⏵',  color: 'error' },
  dontAsk:           { title: "Don't Ask",           symbol: '⏵⏵',  color: 'error' },
  ...(feature('TRANSCRIPT_CLASSIFIER') ? {
  auto:              { title: 'Auto mode',           symbol: '⏵⏵',  color: 'warning' },
  } : {}),
}claude-code/src/utils/permissions/PermissionMode.ts
| Mode | Behavior |
|---|---|
default | The default. Dangerous operations pop a confirmation dialog for the user |
planPlan mode | Read-only operations only. The model researches first and produces a plan; only after the user approves does it switch back to an executing mode. Exists to prevent “the model misunderstood and just started making changes” |
acceptEditsAccept edits | File-editing operations go through automatically; everything else still asks. Looser than default, stricter than bypass |
bypassPermissionsBypass permissions | Corresponds to --dangerously-skip-permissions. But one layer still can't be bypassed — see 7.2 |
dontAskDon't ask me | Turns every “needs to ask” straight into “deny.” The opposite of bypass — bypass says “allow everything,” this says “deny everything.” For when you don't want to be interrupted and don't want to take risks either |
autoAuto mode | Internal-only feature. A model classifier makes the safety call instead of a human; see 7.3 |
There's also a carefully drawn distinction at the type level:
export function isExternalPermissionMode(mode: PermissionMode): mode is ExternalPermissionMode {
  if (process.env.USER_TYPE !== 'ant') return true      // external users have no auto, so always true
  return mode !== 'auto' && mode !== 'bubble'
}

export function toExternalPermissionMode(mode: PermissionMode): ExternalPermissionMode {
  return getModeConfig(mode).external      // auto maps to default externally
}
Internal modes need an external mapping. The auto mode reports itself to external interfaces as default — so SDK users never see a mode value they can't understand and can't set.
7.2 The Ten-Step Decision Cascade
The core function hasPermissionsToUseToolInner() is a strictly ordered chain of checks, evaluated top to bottom; the first one that matches decides the outcome:
| Step | What it checks | Outcome |
|---|---|---|
| 0 | Abort signal has been raised | Deny |
| 1a | The whole tool matches a deny rule | DENY |
| 1b | The whole tool matches an ask rule | ASK Exception: if this Bash command can run safely inside the sandbox, skip this and keep going |
| 1c | Call the tool's own checkPermissions() | Collects the tool's own verdict; doesn't produce a result directly |
| ↓ ↓ ↓ the next four steps are the bypass-immune layer ↓ ↓ ↓ | ||
| 1d | The tool itself explicitly said “deny” | DENY |
| 1e | The tool declares “a human must be present” | ASK |
| 1f | The user explicitly configured a content-level ask rule | ASK |
| 1g | Safety check: a sensitive path is touched | ASK |
| ↑ ↑ ↑ the four steps above are the bypass-immune layer ↑ ↑ ↑ | ||
| 2a | bypassPermissions mode | ALLOW |
| 2b | The whole tool matches an allow rule | ALLOW |
| 3 | Nothing matched | ASK (falls through to human confirmation by default) |
The four source comments on the bypass-immune layer
// 1d. Tool implementation denied (catches bash subcommand denies wrapped ...)
// 1e. Tool requires user interaction even in bypass mode
// 1f. Content-specific ask rules from tool.checkPermissions take precedence
//     over bypassPermissions mode. When a user explicitly configures a
//     content-specific ask rule (e.g. Bash(npm publish:*)), the tool's
//     checkPermissions returns {behavior:'ask', ...}. This must be respected
//     even in bypass mode, just as deny rules are respected at step 1d.
// 1g. Safety checks (e.g. .git/, .claude/, .vscode/, shell configs) are
// bypass-immune — they must prompt even in bypassPermissions mode.| Step | What it protects |
|---|---|
| 1d | The tool author's judgment. The tool knows best how dangerous its own operations are; its deny can't be overridden from outside |
| 1e | Physical necessity. The “ask the user a question” tool can't complete without a person present; allowing it would be meaningless |
| 1f | The user's more specific intent. A user turning on bypass is saying “stop bothering me about routine operations,” but if they specifically configured Bash(npm publish:*) to ask, that's a gate they deliberately left in place. The more specific configuration wins over the more general one |
| 1g | Irreversible damage. Deleting .git/ means losing the entire version history; modifying .claude/ means the agent rewriting its own permission config; modifying shell startup scripts means planting a backdoor |
“Bypass permissions” does not mean “bypass everything.” This is a mature product judgment: give users the freedom to turn off annoying confirmations, but not the freedom to self-destruct with one keystroke. Without this floor, the first user who accidentally let the agent delete their own .git would lose trust in the product for good.
7.3 Auto Mode: Model Classifier + Three-Tier Fast Path
When the verdict lands on ASK and the current mode is auto, Claude Code doesn't pop a dialog. Instead it calls the model one more time to judge whether the action is safe. This dedicated call is the “classifier.”
But the classifier isn't cheap — it's an extra API request per tool call. So several layers stand in front of it:
if (feature('TRANSCRIPT_CLASSIFIER') &&
    (appState.toolPermissionContext.mode === 'auto' ||
     (appState.toolPermissionContext.mode === 'plan' && isAutoModeActive()))) {

  // Intercept 1: a safety check fired, and it's one the classifier "isn't allowed to approve"
  if (result.decisionReason?.type === 'safetyCheck' &&
      !result.decisionReason.classifierApprovable) {
    if (appState.toolPermissionContext.shouldAvoidPermissionPrompts) {
      return { behavior:'deny', message: result.message,
               decisionReason: { type:'asyncAgent',
                 reason:'Safety check requires interactive approval and permission '
                      + 'prompts are not available in this context' } }
    }
    return result       // stays ASK
  }

  // Intercept 2: the tool declares "a human must be present"
  if (tool.requiresUserInteraction?.() && result.behavior === 'ask') return result

  // Intercept 3: PowerShell (unless a special compile-time flag is on)
  if (tool.name === POWERSHELL_TOOL_NAME && !feature('POWERSHELL_AUTO_MODE')) { ... }

  // Fast path ①: pose as acceptEdits mode and ask the tool again
  if (result.behavior === 'ask' &&
      tool.name !== AGENT_TOOL_NAME && tool.name !== REPL_TOOL_NAME) {
    const acceptEditsResult = await tool.checkPermissions(parsedInput, {
      ...context,
      getAppState: () => ({ ...context.getAppState(),
        toolPermissionContext: { ...state.toolPermissionContext,
                                 mode: 'acceptEdits' as const } }),
    })
    if (acceptEditsResult.behavior === 'allow') {
      logEvent('tengu_auto_mode_decision', { decision:'allowed', fastPath:'acceptEdits', ... })
      return { behavior:'allow', updatedInput: acceptEditsResult.updatedInput ?? input,
               decisionReason: { type:'mode', mode:'auto' } }
    }
  }

  // Fast path ②: allowlist of safe tools
  if (classifierDecisionModule!.isAutoModeAllowlistedTool(tool.name)) {
    logEvent('tengu_auto_mode_decision', { decision:'allowed', fastPath:'allowlist', ... })
    return { behavior:'allow', updatedInput: input, decisionReason: { type:'mode', mode:'auto' } }
  }

  // Nothing matched → actually call the classifier
  const action = formatActionForClassifier(tool.name, input)
  setClassifierChecking(toolUseID)
  let classifierResult
  try {
    classifierResult = await classifyYoloAction(
      context.messages,                    // ★ the full transcript
      action,
      context.options.tools,
      appState.toolPermissionContext,
      context.abortController.signal)
  } finally {
    clearClassifierChecking(toolUseID)
  }
  ...
}claude-code/src/utils/permissions/permissions.ts
What's clever about fast path ①
It temporarily disguises the permission mode as acceptEdits and asks the tool again. The logic: if even the permissive mode would allow this operation, it's genuinely harmless, and there's no need to pay for a classifier call.
But two tools are explicitly excluded:
“Skip for Agent and REPL — their checkPermissions returns 'allow' for acceptEdits mode, which would silently bypass the classifier. REPL code can contain VM escapes between inner tool calls; the classifier must see the glue JavaScript, not just the inner tool calls.”
Put plainly: skip the Agent and REPL tools — their permission checks return “allow” under acceptEdits, which would silently sidestep the classifier. REPL code can smuggle VM escapes in between the inner tool calls; the classifier has to see the glue JavaScript, not just the inner tool calls.
This is a textbook example of “composition-safe ≠ unit-safe.” A is safe and B is safe, but that doesn't make “A, then B, with custom logic in between” safe.
The classifier sees the full transcript
Note the first argument to classifyYoloAction(context.messages, ...): the entire transcript, not just this one command.
This matters. An rm -rf build/ is safe in the context of “the user asked to clean up build artifacts” and impossible to judge without that context. But it raises a problem: the full transcript can run to tens of thousands of tokens, and stuffing it into the classifier would blow it up.
So the tool interface has a method built specifically for this:
/**
 * Returns a compact representation of this tool use for the auto-mode
 * security classifier. Examples: `ls -la` for Bash, `/tmp/x: new content`
 * for Edit. Return '' to skip this tool in the classifier transcript
 * (e.g. tools with no security relevance). May return an object to avoid
 * double-encoding when the caller JSON-wraps the value.
 */
toAutoClassifierInput(input: z.infer<Input>): unknown
Each tool supplies its own compressed representation that keeps only the security-relevant semantics: Bash gives the command-line text, Edit gives “path + new content,” and tools with no security implications return an empty string and drop out of view entirely.
Consecutive-denial tracking: breaking deadlocks
// any successful allow resets the consecutive-denial counter
if (result.behavior === 'allow') {
  const currentDenialState = context.localDenialTracking ?? appState.denialTracking
  if (appState.toolPermissionContext.mode === 'auto' &&
      currentDenialState && currentDenialState.consecutiveDenials > 0) {
    const newDenialState = recordSuccess(currentDenialState)
    persistDenialState(context, newDenialState)
  }
  return result
}
Once consecutive denials hit a threshold, the system stops trusting the classifier and falls back to human confirmation. It guards against this deadlock: the classifier keeps denying because of some misjudgment, the model doesn't understand why and keeps rephrasing and retrying — both sides burn money and nothing ever moves forward.
Note the fallback in context.localDenialTracking ?? appState.denialTracking:
“Local denial tracking state for async subagents whose setAppState is a no-op. Without this, the denial counter never accumulates and the fallback-to-prompting threshold is never reached.”
Put plainly: a local denial-tracking state for async subagents, whose global-state setter is a no-op. Without it, the denial counter never accumulates, and the “fall back to human confirmation” threshold is never reached.
This is a classic “side effect of architectural isolation”: to keep subagents from polluting main-thread state, their setAppState was made a no-op. But that also means any mechanism that relies on accumulating state stops working inside a subagent. So it gets a local copy.
7.4 Permission Rule Syntax
Users can write permission rules in the config file. The syntax has two levels:
| Syntax | Meaning |
|---|---|
Bash | Whole-tool level. Matches every Bash call |
Bash(git:*) | Content level. Matches only commands starting with git |
Bash(npm publish:*) | Matches only commands starting with npm publish |
Edit(src/**) | Matches only file edits under the src directory |
mcp__server | MCP server-prefix level. Matches every tool from that server |
Three kinds of rules: alwaysAllowRules (always allow), alwaysDenyRules (always deny), and alwaysAskRules (always ask).
Whole-tool deny rules take effect “before the model ever sees the tool”
/**
 * Filters out tools that are blanket-denied by the permission context.
 * A tool is filtered out if there's a deny rule matching its name with no
 * ruleContent (i.e., a blanket deny for that tool).
 *
 * Uses the same matcher as the runtime permission check (step 1a), so MCP
 * server-prefix rules like `mcp__server` strip all tools from that server
 * before the model sees them — not just at call time.
 */
export function filterToolsByDenyRules<T>(tools, permissionContext): T[] {
  return tools.filter(tool => !getDenyRuleForTool(permissionContext, tool))
}
This is an important distinction: a “whole-tool deny” doesn't intercept at call time; it keeps the tool out of the model's tool list altogether.
The difference is big:
· Intercept at call time → the model tries the call, gets denied, then gets confused and tries another way, wasting several turns
· Absent from the list → the model doesn't know the capability exists and takes a different route from the start
Content-level rules (Bash(git:*)) can't be filtered at the list level — the Bash tool itself has to stay; only certain arguments need blocking. So they can only be judged at call time.
Shadowed-rule detection
utils/permissions/ has a file called shadowedRuleDetection.ts. The problem it solves:
7.5 Sandboxing and Read-Only Command Detection
Read-only commands are allowed automatically
utils/shell/readOnlyCommandValidation.ts, 66.7 KB. Its job is to decide “is this shell command read-only?” If so, it can be allowed automatically without bothering the user.
That's much harder than it looks, because it has to handle:
- Pipes and redirects —
ls | grep foois read-only;ls > out.txtis not - Command substitution —
echo $(rm -rf /)hides a write inside - Compound commands —
cd /tmp && lscontains two commands, and both need judging - Aliases and functions — the user may have aliased
lsto something else
So the utils/bash/ directory contains a complete shell grammar parser: bashParser.ts (128 KB) + ast.ts (109 KB). It parses shell commands into an abstract syntax tree and analyzes the tree, instead of regex-matching strings.
And there's an experimental alternative implementation: the compile-time flags include TREE_SITTER_BASH and TREE_SITTER_BASH_SHADOW — the latter's name (shadow) shows they're validating the new parser in shadow mode: both parsers run at the same time, disagreements are logged, but the old parser's result is still the one used. That collects accuracy data on the new implementation at zero risk.
OS-level sandboxing
On macOS, Claude Code uses the system's built-in sandbox-exec mechanism (also known as seatbelt). It applies a policy file when a process launches, restricting which paths the process can access and whether it can reach the network.
Step 1b of the permission chain has a special branch tied to the sandbox:
// 1b. Check if the entire tool should always ask for permission
const askRule = getAskRuleForTool(...)
if (askRule) {
  // When "auto-allow inside the sandbox" is on, sandboxable commands skip the ask rule
  // and are auto-allowed through Bash's checkPermissions.
  // Commands that won't be sandboxed (on the exclude list, or with sandboxing explicitly off) still obey the ask rule.
  if (!canSandboxAutoAllow) {
    return { behavior:'ask', ... }
  }
  // otherwise fall through and let Bash's checkPermissions handle the per-command rules
}
The logic: if this command will run inside the sandbox, it doesn't matter that it “looks dangerous” — the sandbox will contain it. So the ask can be skipped. That's “trading stronger isolation for fewer interruptions.”
7.6 The Full Data Structure Behind a Permission Decision
export type ToolPermissionContext = DeepImmutable<{
  mode: PermissionMode
  additionalWorkingDirectories: Map<string, AdditionalWorkingDirectory>
  alwaysAllowRules: ToolPermissionRulesBySource
  alwaysDenyRules:  ToolPermissionRulesBySource
  alwaysAskRules:   ToolPermissionRulesBySource
  isBypassPermissionsModeAvailable: boolean
  isAutoModeAvailable?: boolean
  strippedDangerousRules?: ToolPermissionRulesBySource   // ★ dangerous rules that were stripped
  shouldAvoidPermissionPrompts?: boolean                 // background tasks: can't show a dialog
  awaitAutomatedChecksBeforeDialog?: boolean
  prePlanMode?: PermissionMode                           // mode before entering plan mode, for restoring
}>
Two fields deserve attention:
strippedDangerousRules: rules the system actively strips out
A user's config may contain rules that are “so broad they're dangerous.” The system strips them at load time and records what it stripped (so the UI can tell the user “this rule of yours was ignored because it's too broad”).
The concrete stripping logic is visible in the source, for example:
isOverlyBroadPowerShellAllowRule— strips allow-everything rules likePowerShell(*)isDangerousPowerShellPermission— strips allow rules with prefixes likeiex(download-and-execute) andStart-Process
DeepImmutable: immutability at the type level
This wrapper type makes the entire permission context completely read-only at the type-system level — any code that tries to mutate it fails to compile. Changes to permission state have to go through the dedicated applyPermissionUpdates() function, which guarantees every change passes through one unified validation and persistence path.
7.7 Explainability of Permission Decisions
Every permission decision carries a decisionReason field:
{ type: 'rule',        rule: {...} }            // a rule matched
{ type: 'mode',        mode: 'auto' }           // because of the current mode
{ type: 'hook',        hookName: 'PermissionRequest', reason: ... }  // decided by a hook
{ type: 'safetyCheck', classifierApprovable: false }   // safety check
{ type: 'asyncAgent',  reason: '...' }          // background task can't interact
And a dedicated module, permissionExplainer.ts, translates these reasons into plain language for the user.
Explainability is a hard requirement for a permission system, not a nice-to-have.
When a user sees “this operation was denied” with no idea why, their first instinct is to turn the whole permission system off. But if they see “because line 12 of your ~/.claude/settings.json has deny: Bash(rm:*),” they know exactly what to change.
A security system that can't explain its own decisions eventually gets bypassed by its users.